How to Authorize Your Accounting Office in KSeF
This guide explains how to authorize Solpoint sp. z o.o. to access your company in the National e-Invoicing System (KSeF). Once the permission is granted, Solpoint will be able to view invoices on your behalf.
Step 1. Log in to the KSeF Taxpayer Application
Go to the official KSeF Taxpayer Application: https://ap.ksef.mf.gov.pl/web/?utm_source=chatgpt.com
You can sign in using one of the available authentication methods:
- Login.gov.pl (Trusted Profile, mObywatel, e-ID, or online banking)
- Qualified Certificate
Choose your preferred login method and complete the authentication process to access the KSeF dashboard.

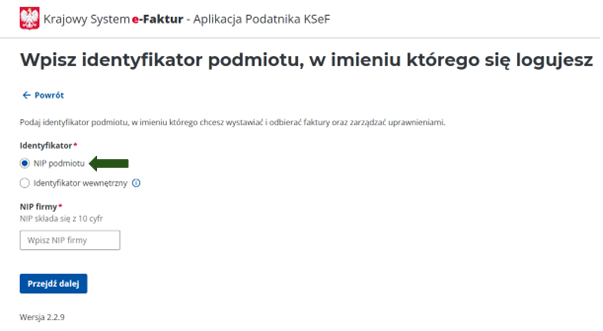
After selecting your preferred login method and successfully authenticating, KSeF will ask you to identify the business on whose behalf you are logging in.
Make sure Company NIP (NIP podmiotu) is selected, then enter your 10-digit Tax Identification Number (NIP) in the Company NIP field.
Click Next (Przejdź dalej) to continue.
Step 2. Authenticate via Login.gov.pl
If you choose to sign in via Login.gov.pl, you will be redirected to the government authentication page.
Select your preferred authentication method from the available options.
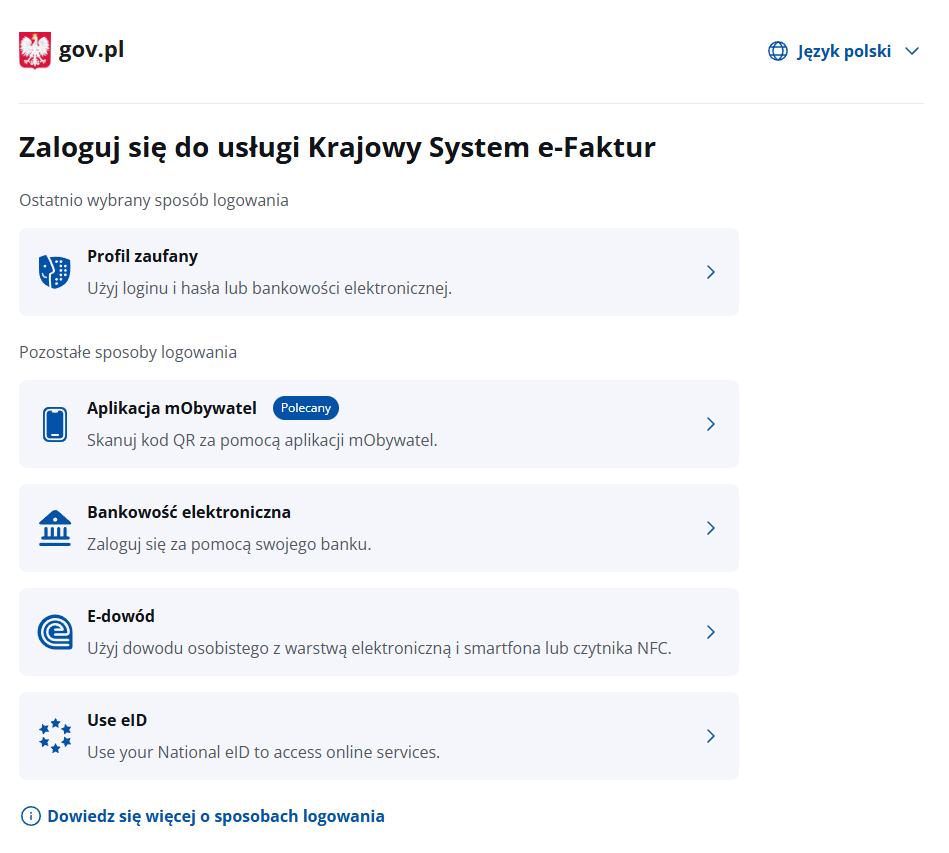
Complete the authentication using your chosen method. Once your identity has been successfully verified, you will be automatically redirected back to the KSeF Taxpayer Application.
Step 3. Open the Grant Permission Menu
After successfully logging in to the KSeF Taxpayer Application, open the menu on the left-hand side of the screen.
In the Permissions (Uprawnienia) section, click Grant Permission (Nadaj uprawnienie) to begin the process of authorizing your accounting office to access your company in KSeF.

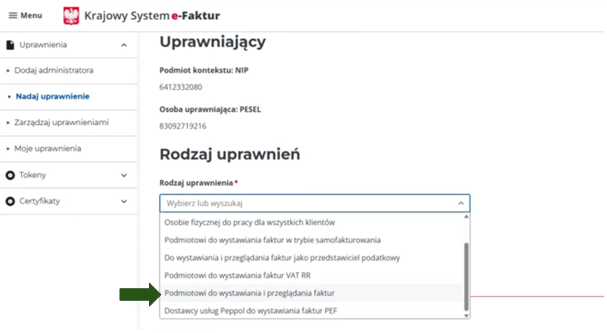
Step 4. Select the Permission Type
On the Grant Permission (Nadawanie uprawnień) page, open the Permission Type (Rodzaj uprawnienia) drop-down menu.
From the list of available options, select “To an entity for issuing and viewing invoices” (Podmiotowi do wystawiania i przeglądania faktur).
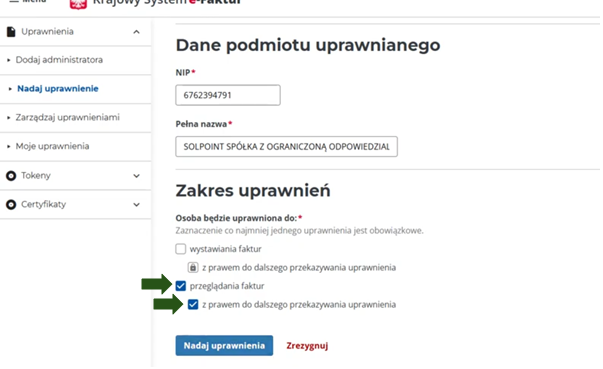
Step 5. Enter the Accounting Office Details
On the Grant Permission page, enter the details of the accounting office you want to authorize.
In the NIP field, enter:
6762394791
In the Full Name (Pełna nazwa) field, enter:
Solpoint spółka z ograniczoną odpowiedzialnością
Before proceeding, verify that both the NIP and the company name are entered correctly.
Next, select the scope of permissions.
View invoices (Przeglądanie faktur)
Granting this permission allows the accounting office to access and view invoices associated with your company in KSeF. Without this permission, the accounting office will not be able to review invoices received or issued through the system.
Also select “With the right to further delegate the permission” (z prawem do dalszego przekazywania uprawnienia).
Enabling this option allows the authorized accounting office to grant the same permission to its employees or other authorized users within the organization. This means you only need to authorize the accounting office once, and it can manage access for its own staff without requiring additional action from your company.
Step 6. Submit the Permission
After you have entered the accounting office’s details and selected the appropriate permission scope, review all the information to ensure it is correct.
Once everything has been verified, click Grant Permission (Nadaj uprawnienia) to submit your request.
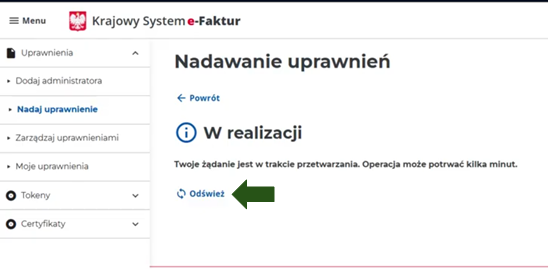
Step 7. Wait for Processing
Your request is being processed. Please click Refresh (Odśwież) in a few seconds.
Step 8. Permission Granted
Once the request has been processed, KSeF will display a confirmation message indicating that the authorization has been completed successfully.
Your accounting office has now been granted the selected permissions and can access your company in KSeF according to the permission scope you assigned.
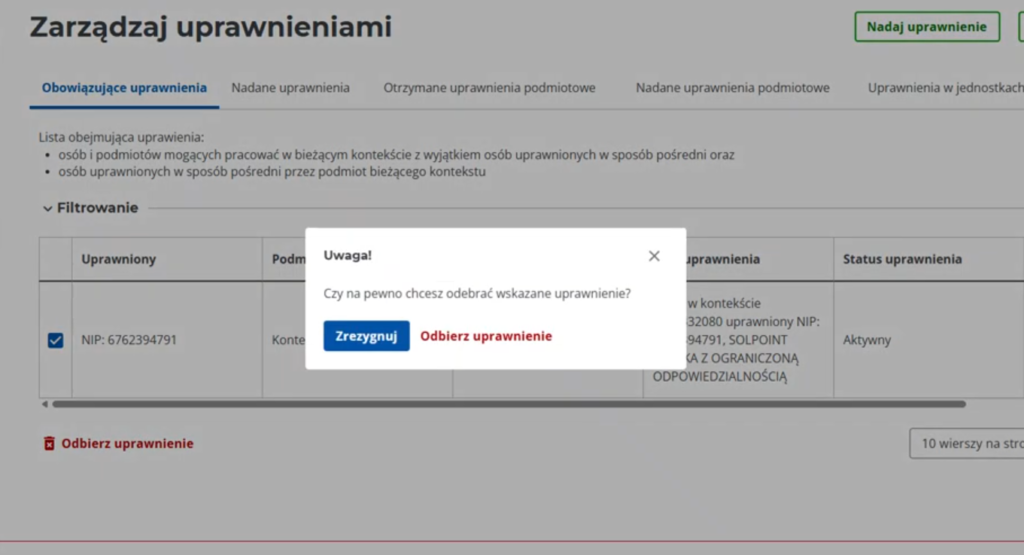
Revoking a Permission
If you need to revoke your accounting office’s access to KSeF, you can do so at any time from the Manage Permissions (Zarządzaj uprawnieniami) section.
In the left-hand menu, select Manage Permissions (Zarządzaj uprawnieniami). On the Current Permissions (Obowiązujące uprawnienia) tab, locate the permission you want to remove.
Select the permission by checking the box next to the authorized entity, then click Revoke Permission (Odbierz uprawnienie) at the bottom of the page.
KSeF will ask you to confirm your decision. Once confirmed, the selected permission will be removed, and the accounting office will no longer have access to your company according to the revoked permission.